If you want to hire a developer to help you with dynamic sections, Online Store 2.0, and Shopify in general, reach out to Stefan. He's my former colleague and one of the most talented Shopify developers I've met.
I searched the entire web and only found solutions that:
Only worked on the homepage (we know how to do that)
Only gave the possibility to add one static section across different pages
Talked about something entirely different but pretended like they could solve the problem
After having gone through the entire Shopify forum, I finally came across a comment from a guy named Tim:
Hey Dan, you can try it with the following concept: Use static section, but with several blocks. Each block will have all settings you want for this section, plus a "filter" field.
At first, I didn't think it was useful, but then I realized how this could help solve my problem! Now, I'm hoping I can help clarify the concept so that it solves yours too!
Here are the bullets of what I'll cover:
Creating multiple pages from a single page template
Add sections to that template and enabling it to serve different content
Show you an alternative method if you have lots of these pages and care about speed
But first, some context to the problem I was trying to solve:
My goal: to build a custom page template and enable non-technical users to create endless pages with different content using this template.
The problem with Shopify is that you can only add dynamic sections through the customizer to the homepage. Although Shopify announced that dynamic sections were coming to all pages, they pulled back the developer previews after initial feedback from the community (not exactly great news).
This means this solution is still the best one out there.
My use case was that I wanted to build a page where I could include x number of sections. From here, repeatedly use any number of those sections across different pages, as well as customizing them for individual pages.
All right. So let me explain the framework for how to create dynamic sections on custom pages in Shopify:
Build a new page template
Include sections within that template
Make each section customizable
Create a new page with the new page template
Use the template to customize pages without writing more code
Let me walk you through each step as I found it most useful:
Step 1: Build a new page template
Open up your Shopify store and follow this path:
Online Store > Themes > Actions > Edit code
Find the "Templates" folder on the left side and click "Add a template".
If you're using something like slater then you still need to follow the step above to preview the template. Then go ahead and add the file to your templates folder like you normally would.
Name the template whatever you like, but remember to use the following syntax: "page.YOUR-NAME.liquid". The "page" tells Shopify that it's a template for pages. "liquid" signals that the code inside is using the liquid-language. I'll name my template "page.dynamic.liquid".
Step 2: Insert sections into the page template
Now that we've created the template, let's add sections to it and build the magic part of this solution! To do this, follow the step above but instead of creating a page template, open the "Sections" folder and click "Add a section".
In this case, you can name the sections whatever you'd like, but for the sake of simplicity, I'll name mines "Section1.liquid" and "Section2.liquid". After you've created them, go ahead and import them to the page template that we created earlier:
{% section 'section1' %}
{% section 'section2' %}
You can wrap these sections in a container if you’d like. In my case, I simply added them right after each other without any other code on the site.
Step 3: Make each section customizable
Now that we've added the sections to our page template, it's time to write the actual code that enables us to use these sections across different pages and enable them to serve different content.
The Section1.liquid file
I'll show you the basic code and then we'll cover the different parts and how to structure your schema for the sections. The following code goes in our "Section1.liquid" file:
{% for block in section.blocks %}
    {% assign b = block.settings %}
    {% if page.handle == b.page_handle %}
        <section {{ block.shopify_attributes }}>
            <img src="{{b.image | img_url }}">
        </section>
    {% break %}
    {% endif %}
{% endfor %}
Some of this might make sense to you. If not, then that's entirely okay too. We'll go over an example in the customizer that should clarify a few things for you.
Step 4: Create a new page with our template
Go ahead and create a new page in Shopify using our new "page.dynamic" template by selecting it in the dropdown list in the bottom right corner.
I'll call mine "About me" as this is where we'd show one of the images in the blocks we set up.
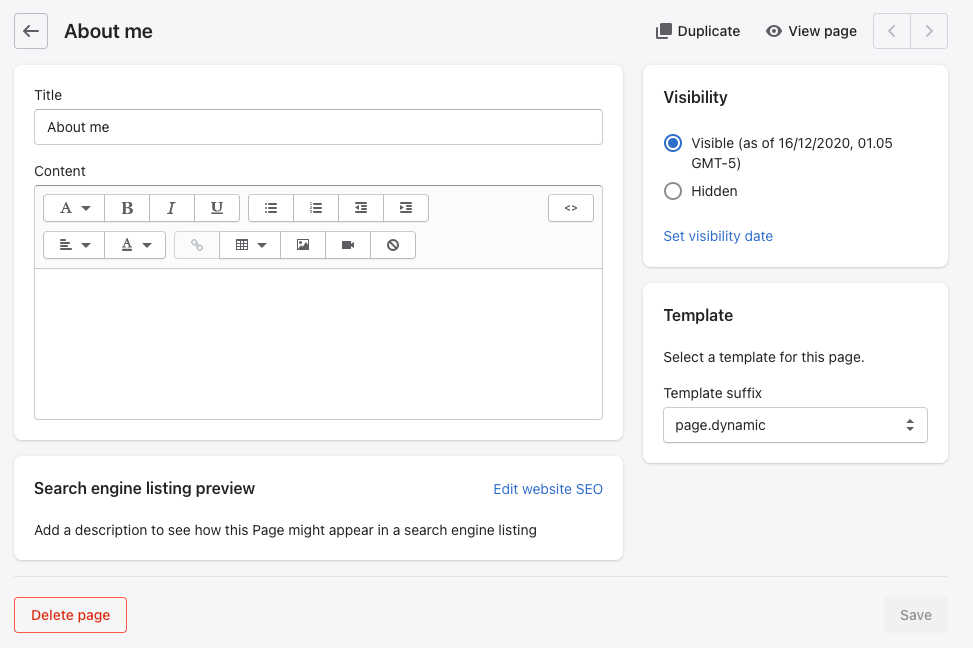
After you've done this, go ahead and open up your customizer and choose your new page from the dropdown.
You should see something similar to what I'm seeing below, given that you haven't added any content to the 2nd section in our page template file.
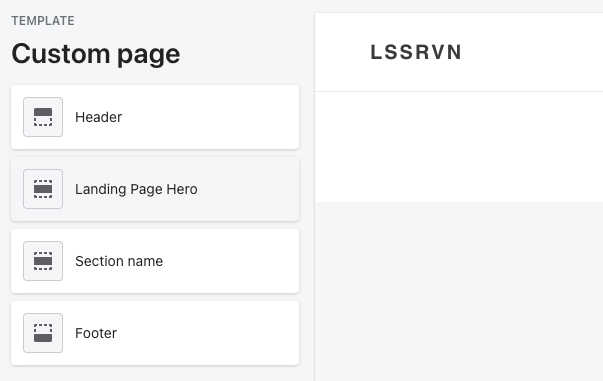
Now go ahead and click the "Landing Page Hero" section and add the about-page as your first block. The title field is not outputted on the page and is simply to help you maintain a great overview of your blocks in this section.
I'll show you how I have mine set up:
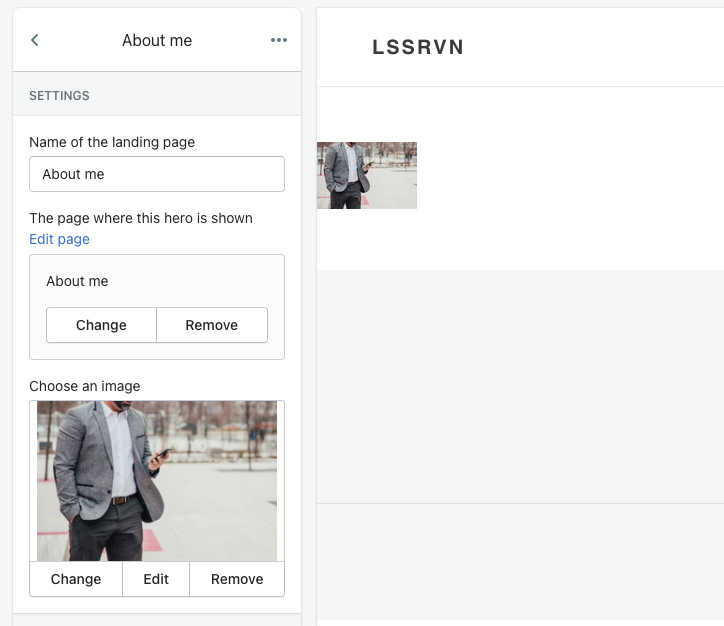
Customizing the second section in our template
For the second section in our page template, I'd like to show something a tiny bit different.
For this section we'll change the liquid code a tiny bit, which will allow us to display its content on multiple pages. Here's the code for "Section2.liquid":
{% for block in section.blocks %}
    {% assign b = block.settings %}
    {% if b.page_handle contains page.handle %}
        <section {{ block.shopify_attributes }}>
            <img src="{{b.image | img_url }}">
        </section>
    {% break %}
    {% endif %}
{% endfor %}
The only change we've made is on the 3rd line where we've switched around "b.page_handle" and "page.handle". We'll also make a tiny change to the schema for this section:
{% schema %}
{
    "name": "Landing page image",
    "blocks": [{
        "name" : "Landing Page Image",
        "type": "Hero",
        "settings": [
        {
            "type": "text",
            "id": "title",
            "label": "Name of this section"
        },
        {
            "type": "textarea",
            "id": "page_handle",
            "label": "The pages where this image is shown"
        },
        {
            "type": "image_picker",
            "id": "image",
            "label": "Choose an image"
        }
        ]
    }
    ]
}
{% endschema %}
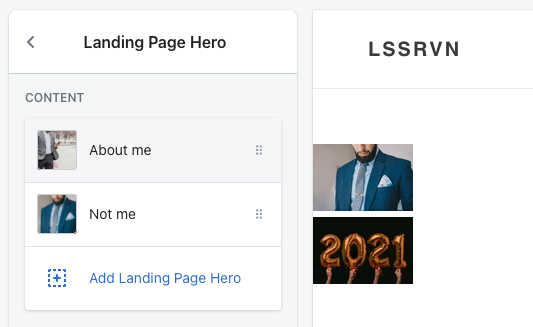
Open up your Shopify customizer, navigate to the same page and you should see something similar to what I have. The two sections where we filled out info in the first. Now go ahead and open the second one and fill in something similar to what I have here:
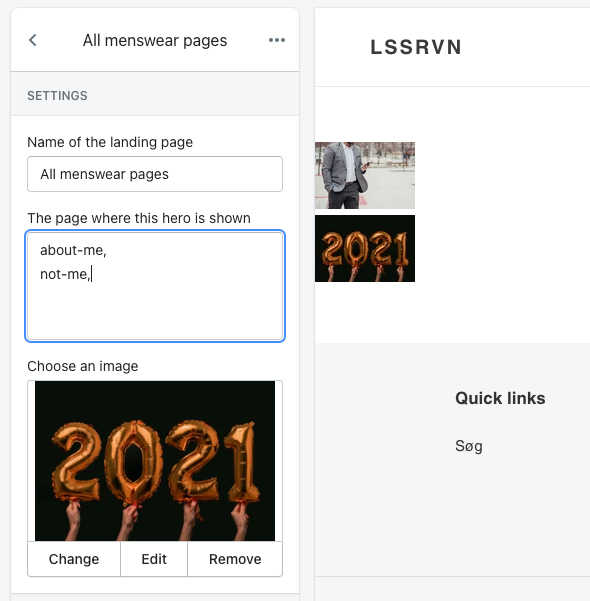
As you can see, I changed the second schema element in this section from being type "page" to "textarea". This allows us to provide the handles of the pages we'd like to display the content on. In my case, I've added both my "about-me" page and also my "not-me" page.
Step 5: Use the template to customize pages without writing more code
Now that we've created one of our pages, let's go ahead and use the same page template to create the "not-me" page. Go ahead and create your own in the Shopify backend and open choose that page from the dropdown menu in the customizer.
You might be surprised to see that there's already an image here and this is because we added it from the previous step. Now if you open up the first section add a new image here, provide the "not-me" page as the place you'd like it displayed, you should now see the magic of this logic.
Ps. I just published a new post on How To Split Test Shopify Product Pages - go check it out and let me know what you think.
Voila! We now have:
One-page template usable on multiple pages
Two sections, one that is unique on every page and one that can be shared across different pages
From here I'd be able to apply some styling to these sections (I didn't for now as it was actually nice with small images to explain the logic) or swap out the contents of the sections with other things like text or products.
The alternative method if you have lots of these pages and care about speed
Earlier in this post, I mentioned an alternative method to what I’ve explained so far.
This method is most useful if you have landing pages that contain most of the same elements like:
Hero section
Product section
CTA section
We’re going to use the content of each page (the text provided in the admin section) to determine what to show on it. As that is one of the other unique things about each page alongside the handle of the page, it’s indeed useful for this scenario.
My example here is quite simple, but I hope you can imagine the possibilities that this brings. First, I’ll show you the page content and then we’ll head over to the code of the landing page template.
Before adding in your own code, head back to step 1 in this guide and create a new template for this alternative approach. I’ve named mine "page.fast.liquid".
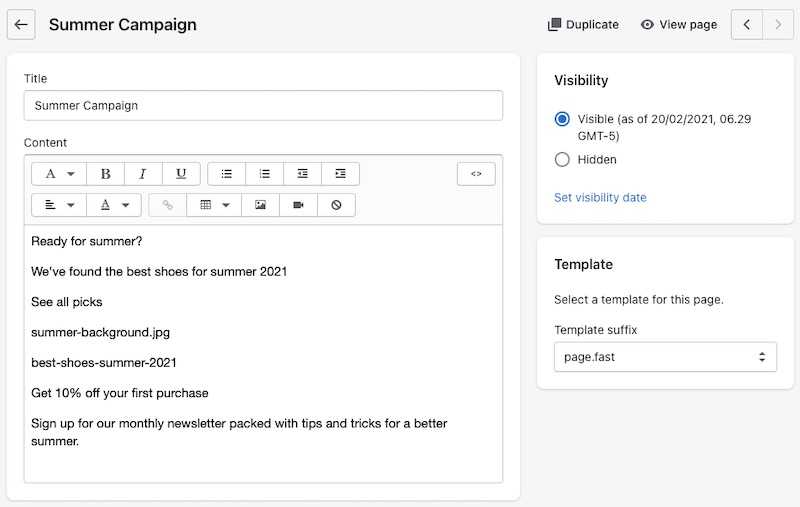
As you’ll see here, I’ve basically just inputted some text into the page content via the admin backend. I’ll show you how this is utilized.
If I just go ahead and view the page from here, it simply shows the text I’ve written. So let’s try and change that. This is the content of my "page.fast.liquid" file:
{% assign content = page.content | split: "</p>" %}
<!-- Assigning each item in the array to its own variable -->
{% assign hero_title = content[0] | strip_html %}
{% assign hero_description = content[1] | strip_html %}
{% assign hero_cta = content[2] | strip_html %}
{% assign hero_image = content[3] | strip_html | strip_newlines %}
{% assign collection = content[4]] | strip_html | handleize %}

{% assign cta_title = content[5] | strip_html %}
{% assign cta_description = content[6] | strip_html %}

{% render 'hero', image: hero_image, title: hero_title, description: hero_description, cta: hero_cta  %}
{% render 'product-grid', collection: collection %}
{% render 'cta', title: cta_title, description: cta_description %}
Let's take a minute to go over the code before seeing the results.
In the first line, I'm splitting up the "page.content" which is the text we inputted in the Shopify admin. When splitting it, this creates an array with the different parts in it. I split based on the "</p>" tag, which I know is the end of each line, making a perfect separator for my content.
The next 7 lines of code are basically just me accessing different parts of this array and assigning those values to variables. Furthermore, I strip away the HTML that surrounds the text from "page.content" (a very important step).
The last 3 lines are where I include (Shopify now prefers that you use "render" instead of `include`) the different `snippets` on the page and pass in those variables that I just assigned.
I could show you the code from the snippets but that won't be useful to you in this example. You most likely have your own snippets that you use in your theme.
Let's say you have your own custom-built header. Split up the page content and include that header while passing in those variables that we assigned.
Here's the result after adding a bit of styling to the different snippets:

Nice! Right?
As I mentioned, if you only have a few landing pages, the first approach is a more "clean" approach. But if you have a lot of these pages and they're very standardized, using the second approach would probably yield the fastest load times.
Whenever people start a new Ecommerce gig in a company that uses Shopify, I've seen many stumble across this exact issue which is why I wrote this post.
If this was useful in any way, please let me know. I've had a ton of questions from different people asking me to elaborate on specific parts of this guide, and I'm always improving it based on their feedback 🙌
